Refinishing your cabinets is a great way to freshen up your kitchen. A professional can fix small damages, like scratches or dents, and help you choose colors that will be trendy for the long-term. It’s important to view paint samples under natural and artificial lighting.
Cabinet Refinishing Sacramento is also less invasive than replacing cabinets. It can be completed in a few days, and will minimize the disruption to your home life.
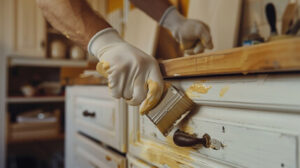
The cost of Cabinet Refinishing depends on the materials needed to get the job done. These include a screwdriver, sandpaper, masking tools, wood filler, high-quality paint, and a brush or sprayer for applying the finish. The amount of time and labor required also adds up to the overall project costs.
Before the new finish can be applied, all surfaces need to be cleaned and sanded. Then, holes and cracks are filled and the cabinets are ready to be repainted. To ensure the quality of the final product, it is advisable to use a cabinet-grade oil-based latex primer and 2K urethane or enamel paint. These finishes offer more durability than a regular water-based paint and are easier to clean.
Depending on the style and design of your kitchen, you can choose from many different color and stain options for your cabinets. You can go with a simple, traditional look using white or a rich, dark cherry, or you can opt for a modern, sleek design with natural wood grain or metallic accents.
Refinishing is an option for homeowners with a limited budget who want to refresh their cabinets without the expense of replacing them. However, refinishing isn’t suitable for all styles of cabinets and may not last as long as the more expensive option of replacing the entire cabinet. If you’re looking for a more dramatic change, refacing might be a better option for your needs.
Time
Cabinet Refinishing is a time-consuming process, especially if you’re doing it yourself. It requires a lot of patience and attention to detail, but it can be a rewarding project that you’ll love for years to come. The exact timeline depends on the size of your kitchen and the type of finish you choose. However, the overall process can take several days to a few weeks.
Cabinet refinishing involves stripping existing cabinet doors and drawer fronts, repairing any damage, and then applying new stain or paint. It’s a great option for homeowners who want to update their cabinets without spending a fortune. It’s also a more environmentally friendly option than cabinet replacement, as it reduces waste and uses less energy to manufacture new materials.
Before you start the refinishing process, set a realistic timeline and gather all of your tools and materials. It’s a good idea to label each door and hardware piece to streamline the reassembly process. It’s also helpful to set up a workspace that will be protected from dust and debris during the refinishing process.
Before you apply your new finish, inspect your cabinets for any imperfections and fill in these areas with wood putty. Sand the surface afterward to ensure a smooth and even finish. Then, apply your chosen finish and allow it to dry completely. It’s important to use high-quality materials for a long-lasting and durable finish.
Preparation
Cabinet refinishing is a cost-effective and eco-friendly alternative to replacing your existing cabinets. The process involves removing the old finish, repairing any damage, and then applying new stain or paint to revitalize your kitchen’s look. It also allows you to customize your cabinetry and infuse your personal style into the room. While the refinishing process is labor intensive, it can be done by yourself or with the help of professionals.
Proper preparation is essential for a successful project. This includes sanding, cleaning, and priming the surfaces. Start by emptying your cabinets and removing the hardware. Use a mild detergent solution to clean the surfaces and remove grease and oil residue. If necessary, use a nylon pot scrubber or synthetic steel wool to scrape stubborn areas. Then, wash and scrub the surfaces with soap and water. After washing, you can use trisodium phosphate (TSP) to emulsify grease and allow the surfaces to dry completely.
Next, sand the cabinet surfaces with a medium-grit sandpaper to create an even surface for painting. When sanding, make sure to follow the wood grain for a smooth finish. After sanding, vacuum the cabinet surfaces with a brush attachment and tack cloth to remove dust particles. Once the surfaces are dry, apply a high-quality primer to ensure that your finish adheres.
Tools
Cabinet refinishing is a home improvement process that breathes new life into old, tired kitchen cabinets without the cost and hassle of a full kitchen remodel. The process involves removing the existing finish, repairing any damage, and applying a new stain or paint. A variety of tools and materials are needed, including a screwdriver for hardware removal, sandpaper for stripping and smoothing, wood filler for repairs, a brush or sprayer, and the chosen finish. It is important to understand the strengths and limitations of each tool, as different application methods can affect the quality of the final result.
A good plan is essential to the success of the refinishing process. Start by establishing a realistic timeframe and working within it. It is best to do the work over consecutive days to allow for proper drying between coats. Make a list of all the necessary tools and materials, and plan for any alternate storage or temporary kitchen setups that will be required. Protect surfaces that are not being refinished by using a mask, and consider using Frog Tape, which has a powder coating to prevent paint bleed.
Before starting, clean all surfaces to be painted with a degreaser. Cleaner surfaces will provide better adhesion and a smoother finish. It is also helpful to inspect the surface for any imperfections that need to be addressed. Any dents, scratches, or holes should be filled with wood filler and sanded before proceeding.
Materials
Cabinet refinishing is an economical alternative to purchasing new cabinets and can help you achieve the look you want for your kitchen. To get the best results, it’s important to use high-quality materials. This ensures that the paint or stain will adhere and last. Additionally, it will reduce the need for touch-ups and refinishing in the future.
You’ll need a few basic materials for this project, including sandpaper and a good primer. You’ll also need a brush and sprayer for larger surfaces. Before you start, make sure to remove all hardware and label it with a number so that you can put it back together in the right order. It’s also a good idea to wear clothing that you don’t mind getting messy, and to put down drop cloths to protect your floors and other surfaces from paint drips.
It’s also important to know what kind of surface you’re working on, as different types of wood require different finishes. You’ll also need to decide whether you want to paint or stain your cabinets. Both options have their own benefits, but it’s crucial to research the maintenance requirements and durability of each one before making a decision.
It’s also a good idea to choose low-VOC or eco-friendly paint to minimize harmful emissions. Lastly, it’s essential to work in a well-ventilated area when painting or staining. This will prevent dust and fumes from settling in your lungs and will ensure a clean finish.
Safety
Cabinet refinishing is an important job, but it can be dangerous if not performed properly. It involves using chemicals and tools that can be harmful if not handled properly, especially if improper ventilation is used. This can result in damage to your cabinets that is costly or impossible to repair.
The first step of refinishing is to thoroughly clean your cabinets. This is necessary to ensure that the new finish adheres. You can use a combination of synthetic steel wool and soap to remove any food residue, or try a degreasing solution like trisodium phosphate (TSP) mixed with water. After cleaning, be sure to dry your cabinets thoroughly before applying the new finish.
When refinishing your cabinets, it is best to hire professionals to avoid damaging the wood. A professional will also provide a better and more durable finish. In addition, they can help you choose the right stain color and finish for your cabinets.
Refinishing is an excellent way to update your cabinets without spending a lot of money. It is a great way to make your home more appealing and increase its value. However, it is crucial to know what type of finish you are looking for and the costs associated with each option. Refinishing is a cheaper option than replacing your cabinets, but it may not be the best choice if your cabinet doors are severely damaged or you want to change the design of your kitchen.